18 May 2013

How to cheat at growing herbs

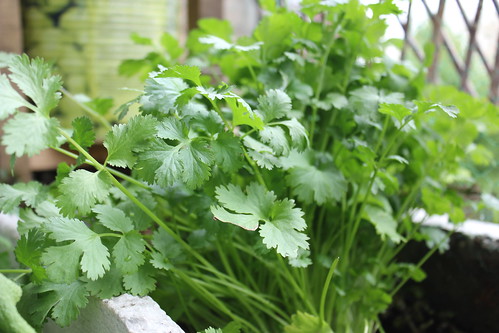
Coriander

I use a lot of herbs in salads and my cooking and, until the growing season gets going in late spring, I find myself paying for pots of supermarket herbs knowing there is every likelihood that they'll keel over before I've finished using them. This seems to be especially true of my favourite herb, coriander (which you may know as cilantro).

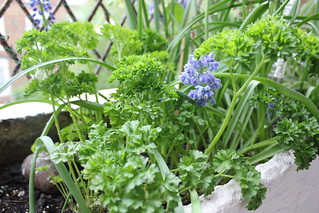
It's been the same story with parsley, thyme and chives - in fact every bought herb!  But no more.  I have a built in windowbox on my balcony, just 9 inches depth and width (front to back) with a length of 70 inches. At the beginning of winter, I transplanted some shop bought parsley into the windowbox thinking this might lengthen its useful life by a week or so.  It's still flourishing.  Several weeks ago, I did the same with a pot of coriander.  Same story.  In fact, both have grown and are looking very lush. 

So, whether you want to avoid the wait for home-sown herbs or simply to extend the life of your shop-bought herbs, here's how to do it.

As soon as you bring pots of supermarket herbs home, take off the cellophane wrapper, give them a good watering if the soil feels dry and prepare a hole in your planter, terracotta pot or window box.

If you're starting a planter from scratch, use multi-purpose compost - and, if you have any, add several handfuls of perlite or grit added for drainage.

The hole should be at least a third larger than the pot the herb came in.  A tiny sprinkling of bonemeal well mixed into the soil at the bottom of the hole will help the roots to establish in their new home. (Don't worry if you don't have any.)

Take the herb out of its pot, carefully tease out one or two roots if necessary, and place in the hole.  Put the soil back all around the plant, gently firming it in and making sure that the plant is sitting at the same soil level as it was in its pot.  Gently water the soil all around the plant to settle the soil around the roots - and don't forget to keep the soil moist (but not wet) by checking daily to see if more water is needed. (Do this by pushing a finger about 2 cm into the soil; if the soil feels dry, the plant will need watering.)

There.  That should take all of 10 minutes, or less, and give you weeks of lovely fresh herbs*.

Parsley

Herbs produced for supermarkets are intensively grown with too many plants in the pot to survive beyond the seedling stage.  There simply isn't enough space or nutrients in the pot for the herb to grow well.  By transplanting into a bigger space, the roots can seek out more nutrients and the plant not only survives but thrives! 

*Coriander, parsley and chives respond well to having the occasional stem snipped off and will reshoot (but not forever), especially if the soil around them is kept moist (but not soaking!).  Coriander doesn't normally reshoot, so I imagine that this is because, as the plant is trimmed, smaller seedlings have access to light and air and so grow. Whatever the reason, it works - and it's so great to have fresh herbs on hand!
.............

11 May 2013

Typical British spring weather!

Cherry blossom

Two days ago, on popping down to the gardens, I was astonished by the sight of the blossom on the fruit trees.  The warm sunshine had brought on a display that would have done a bridal florist proud.  Waves of foaming white blossom graced both cherry trees; the apple blossom, although less prolific, was equally beautiful.

Apple blossom

Yesterday, as with the rest of the UK, we were hit by gale force winds.  These have eased very slightly for today but I'm anticipating that there won't be much blossom left by the end of the weekend so I'm pleased that I took these photos for posterity.  Only time will tell if the flowers were pollinated in time to produce fruit this summer.  The pears and plums had already lost their blossom so I remain slightly hopeful of some of the trees producing.

For the past few years we've had a blast of warm weather followed by April showers and May gales.  I remember planting out my beans and sweet corn a couple of years ago after weeks of warm sunshine. The next day they were decimated by gale force winds and lashing rain and I had to resow.  This year, I'm being more cautious - I still have lots of seedlings on my balcony. They must go into the garden soon so, once the winds have died down, a nice bout of British late spring weather will do me nicely - and by that I mean cooler temperatures - around 12C (54F) - and plenty of showers.  I've appreciated the warm sunshine while it lasted but now it would be nice to return to a gentle move towards summer.  Well, a gardener can dream ... this is British weather, after all. (And Chelsea flower show starts in 10 days which is pretty well guaranteed to mix the weather up!)

10 May 2013

How to grow Honeywort - one of the best bee-friendly self-seeders for your garden

In my last post, the photo of Honeywort (botanical name Cerinthe major 'Purpurescens') flowering ridiculously early certainly generated a lot of comments. It turns out that this plant is a favourite with many folks and deservedly so.


A comment left on that last post asked for advice on growing Cerinthe from seed saved last year.  I have to say that it couldn't be easier.

At this time of year (late spring), you can sow them outside, direct into finely raked soil. Water the soil first and cover the seeds with a bare quarter inch of soil.   You can also do this in autumn (late September) to get them off to an early spring start.

On the other hand, if you only have a few precious seeds, start them in small pots or modules indoors: soak seeds overnight to break down outer casing, sow at same depth of seed (about 2 - 3 mm deep) into free draining soil, wait 7 - 14 days for germination, let the seedling grow a bit before potting on; at about 3 inches tall, with 3 to 4 leaves, harden off and plant outside, leaving about 40cm between plants.

They're a Mediterranean plant and their waxy blue-green leaves are a big clue as to where to site them - a nice warm spot with plenty of sunshine will suit them best and see them thrive.  The soil doesn't have to be anything special, but must be well drained.  Mine grow on top soil over London clay and usually reach about 50cm high.

The stems can get a bit straggly in time and, as the drooping flowers are the whole point, it's quite nice to just support the stems a bit by staking, if you can be bothered. If you plant them closer together, they'll  prop each other up but won't look as nice.


They flower over a long period.  If you're lucky, as they develop you'll get blue-green leaves with deep blue bracts surrounding a purple flower.  This isn't always the case though;  I've had Cerinthe with grey-green leaves and pink flowers in previous seasons.

Remember these plants are really good self-seeders; seedlings will pop up every year once you've had one plant in your garden.  Every purple flower has two fat seeds inside; not all will germinate but it's a good precaution to collect the seed before it drops.

Like Marigolds, etc, Cerinthe seeds can also be sown in the Autumn for earlier spring flowering. They are hardy plants and, once established, will pretty much cope with anything.  Slugs don't like them.  This is the first time that mine have come through the winter.  The warm extended autumn of 2011 meant that I pulled the ropey looking plants much later than usual, giving the seeds time to drop.  The cold and rain of 2012 meant that the conditions weren't right for germination until late summer so my plants were still relatively young by the time winter arrived and were left in situ.

A few gangly sorry looking specimens were put out of their misery earlier this year but the healthier ones were left - and I have early spring flowers as a result. It's lovely to see as other self seeded flowers (nasturtiums, sunflowers, marigolds, orach) are only just beginning to get going.


They're not edible but are a real magnet for bees as the purple flowers are a good source of nectar. They also make an interesting cut flower and will last better if you sear the ends of the stems in hot water for 30 seconds.  Grow them with Escholzia (Californian Poppies), Atriplex rubra (Orach), Verbena bonariensis, Bupleurum rotundiflorum and Linaria (toadflax) for a colourful display.

I hope this post has been useful and will inspire more people to grow these lovely plants.  Seeds are available all over the internet, although they're unlikely (but not impossible) to be found in garden centre or supermarket seed racks.  I started my Cerinthe stock with one small plant bought from Sarah Raven's nursery at Perch Hill and saved the seed each year thereafter.


29 Apr 2013

It's all bloomin' lovely!

I've spent the weekend sowing seeds and heaving out weeds.  I was in the garden by 8 a.m. on Sunday morning, appreciating the stillness and warm sun on my back.  It felt really good to be outside without a  woolly hat and warm coat, reconnecting with the garden and taking the time to really take stock of what was going on.

Fruit tree border 28 April
After the big Weed Out: 16.5 square metres of weed free tidiness, ready for planting.
Mostly it was a case of clearing the weeds (Hairy Bittercress and Chickweed) from the fruit tree border - a job that brought me up close to the blossom on the trees as I have to clamber into the walled border.  There's no rain or frost forecast for at least the next 10 days and the warm weather has certainly got the bees buzzing around.  I am therefore quietly optimistic of having some fruit this year.

One of the cherry trees - a Morello - was relocated to a walled corner last year (just seen in the distance, by the steps); its blossoms are already open.

Cherry blossom 28:4:13

The other Morello has hundreds of buds just waiting to unfurl...

Cherry blossom by steps 28:4

The apple trees, both Braeburn, didn't produce one solitary fruit last year.  This year I've counted 12 clusters of blossom on one tree alone.  I'll keep an eye on these; if they all pollinate, I'll need to thin some of the fruit later on.  It's the same story with the pears and plums which is just wonderful.

Apple blossom 28:4:13

Throughout the garden I'm finding self-seeded Orach (Atriplex rubra) also known as Mountain Spinach.

Orach 28:4:13

It's both an edible and ornamental, with edible young leaves - salads or cooked like spinach - and the most glorious bright pink seed pods later in the year.  I bought one tiny plant at an NGS plant sale a couple of years ago. Last year a transplanted self-seeder grew to over 8 feet tall; the dried seed pods looked so wonderful that I left them in situ and the wind has done the rest.  The seedlings can easily be pulled out if unwanted or transplant really well. I shall, of course, keep several for my Salad Challenge.

Can I just indulge and show off these two beauties?  The Cerinthe (aka Honeywort) seed blew into a pot of Lemon Balm last year, grew to a foot high, just about survived the winter and has revived itself to flower early.  One of my absolute favourite flowers, I love the glaucous leaves and purple flowers and grow them to provide food for the bees so that they'll home in and find my beans in the process.

Cerinthe 28:4:13

And, lastly, an Aquilegia I bought recently - another Morrison's bargain - that has established really well into my new shady border.  I can't get over how pretty it is and stop to look every time I pass by - which is kind of the point in planting up a border previously used as a cat toilet/rubbish dump.

Aquilegia 28:4:13

Btw, that was definitely not a 15 minute blog post! Too many photos. Just came in under one hour. Ah well.

27 Apr 2013

Salad Days are here again

The 52 Week Salad Challenge was pioneered last year by Michelle over at Veg Plotting. The challenge is to grow and eat home-grown salad for as many weeks as you can in the year, hopefully for a full year (even in winter!).  Participants in The Challenge share growing tips and blog posts once a month. I thought I'd missed the boat but the challenge is being run again this year (back by popular demand!) and apparently it's never too late to join in.

I didn't grow any salad last year (the less said about that, the better).  This year the idea of growing a variety of salad leaves has taken hold in my imagination, prompted by Michelle's challenge and Naomi's descriptions of the leaves she's growing.  So, in mid-March I sowed a few seeds in a windowsill propagator, topped it off with perlite and kept the container rotated towards the light.

First salad leaves sown mid-March

I'd intended to start by growing a few baby salad leaves from outdated seeds but, 4 weeks after sowing, they'd developed into such sturdy little plants that I've repotted quite a few for growing on outside in the garden.  These are beetroot leaves, Saladin (Cos type lettuce), Cavolo Nero kale, Lollo Rosso lettuce.

Transplanted first leaves

Having delved back into my seedbox, I've come up with what I hope will be an interesting mix of leaves for my challenge.

Buttercrunch - an all year round butterhead and Little Gem Cos (Pennard's Heritage seeds)
Mizuna - finely cut leaves, good flavour
Lamb's Lettuce - leaves with a delicate flavour
Bijou - A splash of colour from red frilly leaves.
Lobjoits Green Cos - a tall crisp lettuce, sweet and crisp.
Mixed red leaves, especially for containers.
Mustard - for oriental colour and bite!
Salad Rocket, Purple Choysum and Bull's Blood beetroot leaves (Jekka McVicar seeds)
Salad Burnet (cucumber flavoured herb), Broadleaf Sorrel (tangy leaves) (More Veg seeds)

Salad seed selection

I've never been averse to chucking a few baby spinach or orach leaves into a salad either.

I always grow nasturtiums, they look so pretty and are very effective at attracting aphids away from other veg;  the leaves and flowers are edible or can be made into pesto so I've grown extra this year.  So far I have Black Velvet, Blue Pepe, Empress of India and Tom Thumb Alaska. Most will go outside into the veg patch but a few are now earmarked for the salad challenge.

Nasturtium leaves

Carrots are another interesting one ... I wasn't going to bother with growing carrots this year although I enjoyed the Little Fingers carrots that I grew in pots last year but then I read that young carrot leaves can be eaten as a salad leaf so they're now back on the sowing plan.  I'm looking forward to seeing whether there is any truth in that and will let you know soon!


24 Apr 2013

Conquering the 15 minute blog post

Sweet Pea Swan Lake

The warm weather over the last week or so has sent gardeners into a frenzy of seed sowing and transplanting, by all internet accounts.  I have not been immune to this as I've previously delayed sowing anything, instead enjoying the relaxed calm of being unable to plant anything out, bar my broad beans and hardy herbs.  This week though, my waking thoughts are concerned with which seeds I can quickly sow before work or in my lunch break, I calculate which plants can be planted out in the hour after work and before dusk falls.  I'm constantly poking my fingers deep into the soil in seed trays to make sure they're correctly watered.  There's a huge amount of seeds to sow and plants to go out and this has coincided with the start of college's summer term, assignments to be completed ready to hand in and a visit to two trade nurseries, as well as digging over and planting up a small shady border at the road end of the garden.

I've taken photos and composed posts in my head but have had no spare time to write anything; so, today, I have resolved to try and master the art of the quick blog post so that I can post more often and keep up with all that's happening.  Well, that's the theory anyway!

And today's photo?  Well that's a sweet pea (Lathyrus odoratus as I have to practise Latin names), growing on my balcony since last year and behaving like a perennial.  It was a pathetic spindly thing that never died at the end of last summer but, as it still had green leaves, I didn't have the heart to pull it out.  I've had greenery all through the winter months and now it's about to flower again.  It's a subtle creamy coloured flower called 'Swan Lake' and very welcome as a sign of the muddled up weather we've had, growing among the mini daffodils, muscari, violas and herbs in my balcony window box.

Hmm.  30 minutes. Not bad.  Over and out.


13 Apr 2013

Hort Couture

Looks like it's going to be a good weekend for being outdoors, but I've already been making the most of the dry but cold weather of recent weeks to start the process of reclaiming another of the long walled borders.  For the ten years that I've lived here, this border has become increasingly overgrown without any annual maintenance with the result that it had begun to take over the adjacent path.

Border to clear

Two summers ago the Hebe at the far end was covered with pink blossom and hundreds of bees busily gathering nectar.  Everywhere I looked, busy, busy bees.  Last year there was no blossom and no bees.  The shrub seemed tired and neglected; lots of spindly twiggy branches under a very shallow but dense canopy of leaves - and sitting in a bed increasingly filled with plastic rubbish.  It was time for some drastic action, especially while the weather remained cold and before any spring growth appeared.
So over the Easter weekend (and spurred into action by my visit to Great Dixter), I wrapped up against the Siberian winds and popped down to the garden with my pruning saw, secateurs and lots of green waste bags.  I meant to just make a start but quickly realised how silly it would look to stop half way along.  One important point of gardening in a community area is to be aware of the visual impact of your work and not abandon projects half way through.  People may not want to get stuck in themselves, but they'll soon say something if a mess is left behind!

Seeing daylight

I hadn't planned on giving over half of my Easter weekend, but that's what was needed.  Once I'd starting pruning, I found two Hebe bushes (over 8 feet tall), a Cotoneaster, an Eleagnus, a Choisya ternata, several varieties of Cornus with stems 15 to 20 feet long with honeysuckle and ivy tightly binding the various shrubs together.  The bare branches underneath were rather beautiful so I just took away the side growth, and dead or crossing wood from the interior, leaving the top canopy to provide some summer shade, and shelter for birds. (Next winter will be soon enough for further work on these shrubs.)

My very good friend Leigh brought regular cups of tea and came as soon as she could to help me trim and bag up the green waste on day two - over 20 large bags went to be recycled! (Plus several carrier bags of plastic bottles, food wrappers, a shoe, a couple of socks, some toys and an old milk bottle - how long had that been there?!)

We were kept company throughout both days by this little chap ...

Robin on branch

... who took a great interest in the proceedings, and was duly rewarded with mealworms and other tasty bird treats once the rubbish was cleared.

Robin supervising

This was the view down to my little veg patch after final bags of woody branches and cornus stems had been disposed of - although I rather regret that last act of clearance as Lorna at The Green Lady has been writing of making hurdles and wreaths out of willow and cornus stems.  I feel I've missed an opportunity to create some lovely natural fences in the veg garden!  (If you fancy having a go, be aware that both willow and cornus stems will root very easily so should only be used for weaving the horizontals.)

Shady border
~ That's better! ~
The photo below is one I took in 2011 as I stood and watched the bees busily at work on the Hebe. If I've done the work properly I very much hope to see this scene again with plenty of food provided for visiting bees along with the other nectar rich flowers and herbs that will be growing in the veg garden by the beginning of summer.

Hebe bees